I have been making themed bentos regularly, usually on Sunday nights for lunch on Monday, and posting the photos on Facebook and Kindmeal.my. It has earned me quite a following.
Food prep takes place on Sundays, and for the rest of the week, I just have to assemble my lunchbox using the ingredients that have already been cleaned and cut and blanched/cooked and stored in separate containers for freshness. It saves me a lot of time and I don't have to worry about driving out for lunch, finding parking and getting back to the office before lunch hour is up.


Food prep takes place on Sundays, and for the rest of the week, I just have to assemble my lunchbox using the ingredients that have already been cleaned and cut and blanched/cooked and stored in separate containers for freshness. It saves me a lot of time and I don't have to worry about driving out for lunch, finding parking and getting back to the office before lunch hour is up.

International Talk Like A Pirate Day bento, 18 Sept 2015.

World Animal Day bento, 4th Oct 2015.

Made this one on 16 Nov 2015 after the Paris terror attack because my heart was hurting for our troubled world.

Ushering in the New Year.

First bento for the Lunar New Year of the Monkey.

A low-carb, almost-entirely-raw-veggie-based monkey bento to mark the end of the Lunar New Year.

Game Night Bento.

Spring Equinox 2016.

Visual presentation is an important factor in bento-making!
Top left: lettuce, vegan coleslaw and edible flowers.
Top right: mulberries, ambarella and a chequered apple.
Main compartment: grilled vegetables under brown rice and quinoa cooked with lemon zest and bay leaves, and air-fried tempeh coated with sriracha, chili powder and turmeric on top.
Top left: lettuce, vegan coleslaw and edible flowers.
Top right: mulberries, ambarella and a chequered apple.
Main compartment: grilled vegetables under brown rice and quinoa cooked with lemon zest and bay leaves, and air-fried tempeh coated with sriracha, chili powder and turmeric on top.

April Showers Bring May Flowers.
An expression of hope for more rain to end the hot, dry and hazy weather.
An expression of hope for more rain to end the hot, dry and hazy weather.

A bento for Earth Day 2016, with Planet Earth onigiri and cherry tomato hearts. The dirt pot at the upper left holds homegrown Brazilian spinach in dirt made from crumbled Ikea veggie balls.

A Southwestern-themed bento to bring out the cowboy in me.
Many people on Facebook, Blogspot and KindMeal.my have asked me how long it takes to make each bento lunchbox and how I manage to cut intricate patterns out of nori.
The typical comments and queries are as follows:
"It would take ages to cut these out of seaweed!"
"Nori sheets are so flimsy and fragile, how do you cut them without tearing them or unintentionally making them moist?"
"Do you trace patterns directly onto the nori sheets? Do you use Exacto knives or any special tools?"
This photo tutorial demonstrates a quick and easy method I developed and improved on to make simple food art. It is created for the benefit of KindMeal.my to promote a healthy plant-based diet and packaging-free meals. As the objective is to encourage the sharing of ideas, please feel free to share this.


Step 2: Cut a sheet of nori seaweed of the same size as the sketch and slide it in between the two halves of the folded sheet of paper.
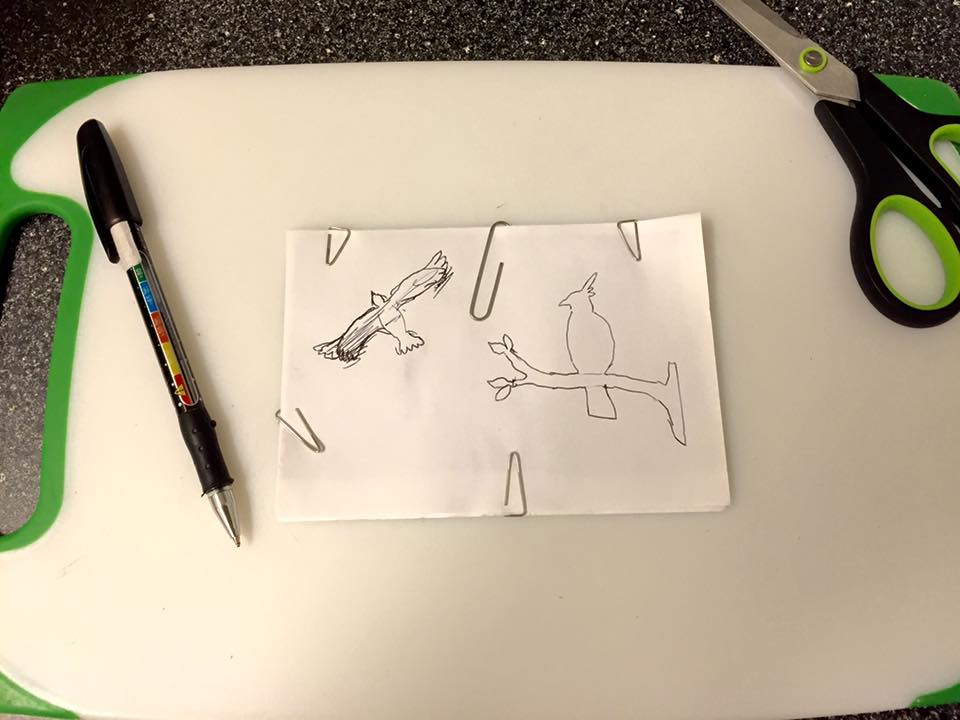
Step 3: Use paper clips to hold the nori seaweed sheet in place.


Alphabet and number cookie cutters can be used both for cutting shapes out of fruits and vegetables (carrots, jicama, fruit leather and dried mango slices work great for this purpose as they do not fall apart easily) and for creating a 'negative' -- in this instance, cutting holes out of the top slice of sandwich bread so that the darker colours of the nut spread beneath will create a colour contrast.
Peel kyuri and other vegetables or fruits with a darker peel in alternating stripes (i.e. Peel an inch, leave the next inch unpeeled, peel the 3rd inch, and so forth) to create a striped effect, and position the striped kyuri slices to create a checkered pattern.
Choose colours and patterns that will stand out for greater visual impact (because the more attractive it is, the more likely it is to be eaten) and use the firmest parts of fresh fruits and vegetables if your lunch box is going to be tossed into a backpack or briefcase.
Hope you enjoyed this post!
No comments:
Post a Comment